Sunday, July 23, 2017

We are done!

Last Friday, we passed the final inspection from Jefferson County and on Monday we get our "Certificate of Occupancy." Yeah! We bought the lot in September 2015 and we are finishing in July 2017. This 22-month project was a huge undertaking, so thank goodness we're ecstatic about the finished home.

Some details to still be completed this week including touch-up painting, installing low-voltage wires, e.g., ethernet, and tweaking various items. When we move in on this Thursday, the house should be quite livable. No doubt we'll discover issues as we live in the house, but that is to be expected. The only major open item is that the stair railing was made incorrectly (a gap was over 4" in one place and two railings that needed to connect did not), so the steel fabricator will fix this sometime in the next couple of months. The same fabricator made the safety grate over the large window well, and that also has some issues. For now, the home is safe, but the custom metalwork ended up being quite a bother.

Landscaping is now underway in earnest and will continue for another month or two, bringing with it yet more decisions. At least we will be enjoying living in it during that next stage of this ongoing project.

I'll close this blog post with some pictures. Below are five photos of the outside of the home.

 Looking across driveway to the front door (note steps and walkway)

 View from the street (the driveway made quite a difference in the curb appeal)

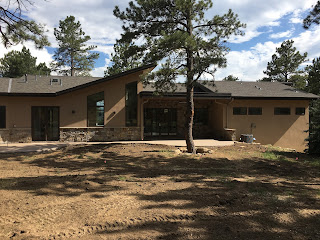
The back yard (master bedroom closet and bath windows are on right)

Covered outside rear patio (6000 watt electric heater is in ceiling)

The garage with a blue epoxy finish (the large box holds our freezer, which can't be installed until the cabinet guy makes the panels to enclose it...something that slipped through the cracks)

Below are some interior shots of the upper and lower levels.

The kitchen (missing doors over the ovens are being re-sized)

 The great room


Fireplace detail (we've started moving in fragile items, including these giraffes)

 Master bedroom and deck

 Lower level rec room

Lower level play area (notice temporary 2" x 4" on railing)

In the end, the construction was on budget and on time. In regards to the budget, all I will say is that it was more than I thought is was going to be when we initially bought the lot. But, once the plans were drawn up, the project costs and timeline stayed on track (in no small part because of the decisions we made along the way to keep it in check). The general contractor, Richard Hansen from Dream Weaver Homes, was hard working and ethical, and took a great deal of pride in getting the details right. Not everything was perfect (e.g., the lemon oil on the panels...see previous blog post), but most stages of construction went smoothly and were well organized. Considering the scope of the project, we were extremely satisfied with Richard's role as GC. Also, thanks are due to to Susan Freilicher, Richard's assistant. And, thanks to my wife Tricia for being my blog editor.

The design of the home took longer than we expected, and that caused some frustration (especially for me). Nevertheless, TKP Architecture did a great job collaborating with us on the design. The floor plan itself was strongly influenced by us. The "working pantry" was Tricia's idea and I wouldn't be surprised if TKP uses it in other homes. TKP took the lead in designing the roof lines, which we love, and which generate a lot of positive comments. The roof lines allow for high ceilings inside and, thus, we have a lot of cubic feet on the first floor. 

Our final advice if you want to build a custom home, make sure you have time to put into the project. There is a big gap between what the architect specs out and what the builder expects you to ask for during the building stages. We had to learn about insulation, furnaces, windows, flooring, gas lines, drywall finishes, plumbing, roof shingles and their affect on insurance rates, and many other things in order to weigh in with reasonable suggestions and make decisions. I don't know how Tricia picked all of the tiles, but she did and they are wonderful. It also helps to be only a few miles from the site. Every time we went over there, we left feeling that we were very glad to have been there for some important discussion or key decision, or to point out something that needed attention. 

In a few weeks, we'll be ready for visitors, so come and see us.

Don and Tricia
7/23/2017

Wednesday, July 5, 2017

About one month to move in

Our scheduled move date is July 27, so that leaves us 22 days to finish the house. What's left to be done? Mostly a lot of detail work; the house is now remarkably complete. In the next month we need to refinish the floors (more on that later), install the stair railing and window well cover, finish the electrical, lay the driveway, and get the appliances and carpet installed. The GC is confident we'll make the July 27th date. We hope he is right, because we have a contract to sell our house on August 1st, and need everything out before then. Below are some details on various aspects of the house since I last wrote in the blog.

Ceiling Panels
The panels on the great room ceiling now look great, but what a headache they created. First, look at the finished product.

Kitchen island looking to fireplace (notice tile wall above cooktop) with pendants installed. The thing hanging from the wall is the wiring for the the hood vent and fan.

Great room

The panels are 3/8" white oak panels that were stained and finished. We put a 1/4" gap between the panels and painted the edges (Tricia and I painted them) and the ceiling dark grey. Given the lack of wood beams in our mountain home, this was a good way to bring wood into a contemporary design.

The problem began when the builder puttied the nail holes (see prior post). The putty did not remove as easily as he thought (he should have tested this more thoroughly prior to proceeding on the entire ceiling). In the end, he covered the panels with lemon oil. Prior to covering the nail holes the panels looked perfect; after the lemon oil the panels looked awful. They looked like a body builder glimmering in oil.

Removing the oil felt like an endless project. I spent probably 20 hours on scaffolding and ladders trying to get the stuff off. The builder spent a lot of time too. The breakthrough was when I got scientific about removing the oil. Below is my test sheet for oil removal solvents.

Test panel for solvents

I applied lemon oil and then tested various combinations of ammonia, mineral spirits, and vinegar to remove the oil. We decided that a combo of water and vinegar was best. With that combination in hand, we were able to get the panels looking good again. Tricia took this shot of me applying the final "wipe down" of the panels.

Final cleaning of panels (cloth-on-sponge suggestion by Tricia was key to a smooth finish)

Patios
The cement patios are now in and look good. There are three cement patios and they are all finished the same. We're using a stained concrete with exposed aggregate. We don't have any shots of the final patio, but here are a couple of shots of the patio getting installed.

Mixer delivering concrete (a bit close to the house) 

Installing the front walkways and side patio

The attached video shows how the concrete is smoothed after it is poured.

Smoothing concrete

Cabinets
The cabinets are now all installed and the tile work, apart from sealing the grout, has been completed. Below are a few shots. I apologize if these are repeats.

Pantry

 Coffee bar detail

Dining room

Hardwood Floors
The floors will look good when finished, but it will take two tries to get there. In a nutshell, the crew that sanded and finished the floors was incompetent and the finishes have to be redone. What a hassle given the mess this makes. So today, we begin our second try at finishing the oak floors. The photo above of the dining room gives you a sense of what they look like. Notice the small piece of blue tape on the floor. It marks one of dozens of "holidays" on the floor. There are so many problem spots that the floors need to be completely refinished. Thankfully the sub acknowledged the issue and is redoing the work at his cost.

Landscaping
We've begun landscaping. Our landscaper has already brought in and planted 9 Colorado spruce and blue spruce trees (for screening), and is now installing irrigation (needed if you want the trees and plants to live). Next steps include installing fencing to partially enclose the back yard and provide more privacy, arranging boulders (a significant feature in most western landscaping plans where water is scarce and browsing animals are plentiful), putting in river rock culverts and drip areas, and adding shrubs, perennials, and ground cover in the front of the house and around the patio in the back. I'll close this blog entry with a shot of the front of the house awaiting irrigation and plants.


My next entry will, hopefully, be of the finished house. 


Saturday, May 20, 2017

Various interior details

Work on the interior of the house continues. We still have a couple of more months to go to, but the final product is taking shape. For this blog post, I'll simple share a few photos of various details around the house.

The pantry with the pass-through to the kitchen

The fireplace with cabinets on either side (note the ceiling)

Wood paneling (white oak) on the ceiling of the great room and kitchen

Nail holes--lots of them--on the ceiling paneling being filled by the GC and Don

A walnut door with with trim

Looking out the master bedroom to the west after our mid-May snowstorm (note the deck is now complete)

Looking SE from Tricia's studio
A detail from the master bedroom shower

The mudroom

A built-in "iron away" in the laundry

Interior painting is now in full swing. The basement is mostly painted and next week they will paint more of the upstairs. Painting a whole house for the first time is a LOT of work. In the weeks ahead the major next steps are getting the cement patios poured, placing plumbing fixtures, and installing electrical switches and fixtures.

That's all for now.

Wednesday, April 19, 2017

Interior work is underway

The house is starting to look more finished. For comparison to my post in early March, below is a picture of the house taken yesterday afternoon from the street. As you can see, it is much more complete.


Many different interior tasks are now underway including painting, installing floors, trim carpentry, and tile work. We've made lots of progress in the last couple of weeks. It is hard to imagine why it will take until August to finish the home, but our builder is sticking to that date. Below are pictures showing various aspects of the interior work.

Finish Carpentry
Work started last week on trimming out the doors and windows, and we are quite pleased with the results so far. In particular, the three-panel walnut doors are beautiful.

 Case and base moulding waiting to be installed

 Interior doors lined up in garage (to be stained after fitting)

A basement bedroom door installed (basement doors are 7' tall and 1 3/8" thick; 
upstairs doors are 8' tall and 1 3/4" thick)

Tile Work
Tricia says there are 37 different types of of tile and quartz in the home. The work is just now beginning.

 Some of our tile in a warehouse in Denver 

 En suite bath in basement

Master bath showing tub and shower with underlayment for tile and heated floor

Flooring
The installation of the hardwood floors should be completed this week. The actual finishing of the wood will occur at the end of the project. We've put 5" white oak boards in the upstairs and in a section of the downstairs. 


Cabinets
Like the doors, the cabinets are walnut. We found a local craftsman who built the boxes using a CNC machine out of 3/4" plywood. The building process is roughly as follows: design cabinets using software, feed CNC machine 3/4" plywood and it does the cutting, and assemble. The door fronts were made by someone he works with. We're quite pleased with the result.

Cabinets stacked in garage waiting for installation

A closeup of two of the cabinets

Utility Room
One feature of the home that I haven't mentioned is the utility room. At the very beginning of this blog there was video of rock hammering. That hammering made it possible to have a full basement, including a unfinished storage room that is about 1100 sq ft. Who knows what we'll do with this.

The unfinished utility room

Next Steps
Among our next tasks are selecting a railing for the interior staircase and thinking about landscaping. If we need to move rocks or more dirt around, it would be good to do this before asphalt is put on the driveway.

Thursday, March 9, 2017

Now working inside and outside

Work aimed at building the basic structure of the home (foundation, drainage, roof, electrical, and rough plumbing) is ending and effort is now turning to finishes. So, the home is starting to look ever-so-slightly finished. Here is a picture of the home from the street taken today.


A lot of work was done on grading the front area and building retaining walls out of large boulders to accommodate the level change from the front door to the basement door. The picture below is a close-up of some of the retaining walls as they are being built. Once we have a complete landscaping plan, there will be more tweaking of rocks (mostly smaller ones), but these walls set up the basic contours and help with drainage.


Insulation
We decided to use 3 types of insulation: closed-cell foam on the "rim joist" and in selected ceiling areas where ventilation was not possible; blown-in L77 pink fiberglass on the exterior walls; and traditional insulation batts on the basement walls and to provide sound insulation between the two levels and between selected rooms. Photos follow.

This pink stuff is the L77 blown fiberglass, held up by netting (which is hard to see in these photos) stapled to the framing. Seems like a great product. Some recommended using cellulose, but many recommended against it. The biggest problem that I heard is that cellulose settles over time. Spraying closed-cell foam on the exterior walls wasn't even remotely cost-effective.


The builder did a good job sealing cracks that would cause air leakage. Notice the hole at the top of the picture. This is where they poked a hole in the netting to spray in the insulation.


Below is a photo in the basement showing how we've insulated between levels and between rooms using traditional batts.


Exterior Stone
The exterior stone looks great. Below are a few shots to give you an idea of what it looks like before the mortar is added. The basic gray mortar will be colored a bit to make it more of a soft gray-tan. This shot is looking into our Great Room. The wood soffit overhang at the top of the photo is larger than I expected, and provides a nice "mountain contemporary" look.


This next photo shows the front of the house, looking from the front door toward the road. Many of the stones need to be cut to get them to fit. This is a hard job and a LOT of work. There is a big crew working on it, and we are very happy with the results.


Below is a photo of the covered patio area in the back of the house.


Below is Tricia's studio window and our garage. Although you can't really see it with this photo, shingles now cover the entire roof.


Drywall
Drywall hanging is now underway in earnest. The installers say the drywall will be hung by Saturday. This is seems ambitious. After the drywall is hung, the sub needs to apply tape, mud, and hand trowel the finish. We probably have another couple of weeks until we are really finished with drywall. Below is the Great Room with partial drywall.


Drainage
One issue of the house design was that the door from the garage to the backyard was too low for the surrounding ground, causing drainage issues. In the end, we put in a 6" drainage pipe in a small concrete well near the door and are running it for about 80' to pull water away from the house. The other option--and this is how we started--was to dig a drainage trench in the middle of the back yard. I don't have any photos of the various states of the back yard, but trust me when I tell you that it was problematic. Fortunately, the excavation sub suggested putting in the 6" pipe and the yard now looks MUCH better.

Next Steps
Among the upcoming items are the following:
  • Staining the exterior wood
  • Installing gutters
  • Installing tile and cabinets
  • Getting the hardwood in the house to dry prior to installing
  • Painting the interior--I'm getting ahead of myself